一些经常会用到的Tips总结。
快速截图
Snipaste
Ctrl + F1 – 截图后直接复制R – 使用上一次截图区域Ctrl+F1 --> R --> Alt+Tab --> Ctrl+V – 快速截图复制
定时截图
可以自动定时截图
https://www.faststone.org/FSCaptureDetail.htm
typora
自动编号
在theme主题的根目录下添加base.user.css文件,并在其中添加如下内容:
  1
  2
  3
  4
  5
  6
  7
  8
  9
 10
 11
 12
 13
 14
 15
 16
 17
 18
 19
 20
 21
 22
 23
 24
 25
 26
 27
 28
 29
 30
 31
 32
 33
 34
 35
 36
 37
 38
 39
 40
 41
 42
 43
 44
 45
 46
 47
 48
 49
 50
 51
 52
 53
 54
 55
 56
 57
 58
 59
 60
 61
 62
 63
 64
 65
 66
 67
 68
 69
 70
 71
 72
 73
 74
 75
 76
 77
 78
 79
 80
 81
 82
 83
 84
 85
 86
 87
 88
 89
 90
 91
 92
 93
 94
 95
 96
 97
 98
 99
100
101
102
103
104
105
106
107
108
109
110
111
112
113
114
115
116
117
118
119
120
|
/** initialize css counter */
#write {
    counter-reset: h2
}

h2 {
    counter-reset: h3
}

h3 {
    counter-reset: h4
}

h4 {
    counter-reset: h5
}

h5 {
    counter-reset: h6
}

/** put counter result into headings */
#write h2:before {
    counter-increment: h2;
    content: counter(h2) ". "
}

#write h3:before,
h3.md-focus.md-heading:before /** override the default style for focused headings */ {
    counter-increment: h3;
    content: counter(h2) "." counter(h3) " "
}

#write h4:before,
h4.md-focus.md-heading:before {
    counter-increment: h4;
    content: counter(h2) "." counter(h3) "." counter(h4) " "
}

#write h5:before,
h5.md-focus.md-heading:before {
    counter-increment: h5;
    content: counter(h2) "." counter(h3) "." counter(h4) "." counter(h5) " "
}

#write h6:before,
h6.md-focus.md-heading:before {
    counter-increment: h6;
    content: counter(h2) "." counter(h3) "." counter(h4) "." counter(h5) "." counter(h6) " "
}

/** override the default style for focused headings */
#write>h3.md-focus:before,
#write>h4.md-focus:before,
#write>h5.md-focus:before,
#write>h6.md-focus:before,
h3.md-focus:before,
h4.md-focus:before,
h5.md-focus:before,
h6.md-focus:before {
    color: inherit;
    border: inherit;
    border-radius: inherit;
    position: inherit;
    left:initial;
    float: none;
    top:initial;
    font-size: inherit;
    padding-left: inherit;
    padding-right: inherit;
    vertical-align: inherit;
    font-weight: inherit;
    line-height: inherit;
}

/* toc 自动编号 */
.sidebar-content {
    counter-reset: h2
}

.outline-h2 {
    counter-reset: h3
}

.outline-h3 {
    counter-reset: h4
}

.outline-h4 {
    counter-reset: h5
}

.outline-h5 {
    counter-reset: h6
}

.outline-h2>.outline-item>.outline-label:before {
    counter-increment: h2;
    content: counter(h2) ". "
}

.outline-h3>.outline-item>.outline-label:before {
    counter-increment: h3;
    content: counter(h2) "." counter(h3) " "
}

.outline-h4>.outline-item>.outline-label:before {
    counter-increment: h4;
    content: counter(h2) "." counter(h3) "." counter(h4) " "
}

.outline-h5>.outline-item>.outline-label:before {
    counter-increment: h5;
    content: counter(h2) "." counter(h3) "." counter(h4) "." counter(h5) " "
}

.outline-h6>.outline-item>.outline-label:before {
    counter-increment: h6;
    content: counter(h2) "." counter(h3) "." counter(h4) "." counter(h5) "." counter(h6) " "
}
|
h1居中
直接在主题文件中添加如下代码,我的是在vue.css中添加:
1
2
3
|
h1{
    text-align: center;
}
|
图片添加圆角和边框
1、在base-control.css文件中修改
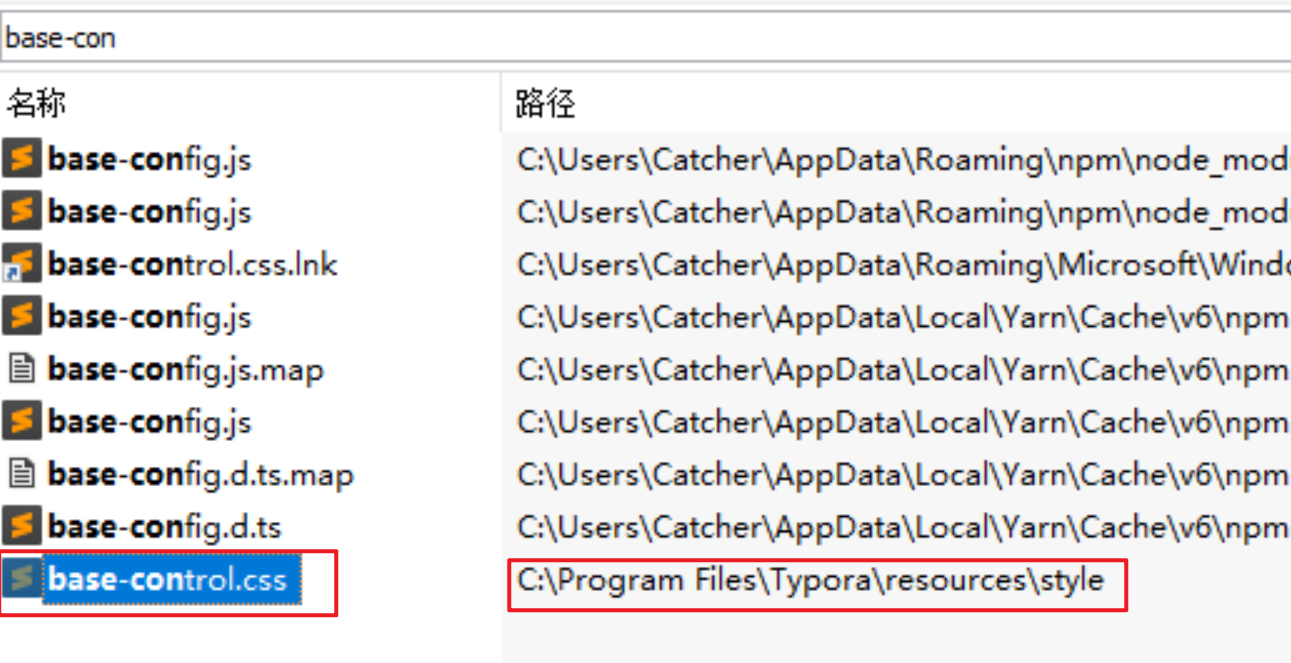
2、查询img{cursor,在后面添加如下代码:
1
|
border: 1px solid #c7cac8; border-radius: 10px;
|

参考
https://support.typora.io/Auto-Numbering/ – 文章标题自动编号
https://pastebin.com/XmYgBbaz – toc自动编号
Typora 自定义格式:引用、行内代码块、图象加边框
其他
直角引号
自己的电脑上输入yp,会出现直角引号,因为之前我有设置过。
